A couple of weekends ago, my living room turned into a whirlwind of excitement when one of our “Apple Tree Scientists” (that’s what we call our little ones when they get curious) tried the Floating Fish experiment. You should have seen the look of wonder when the fish drawing lifted off the plate and floated across the water – it was pure magic and a perfect way to spark a child’s love for science. Moments like that are why we love pulling out easy diy science experiments kids can not only watch but also do themselves with everyday stuff you probably already have at home.
Here at Apple Tree Pre-School BSD, we believe the best science happens when it’s hands-on and full of surprise. So we’ve picked some experiments from the Good Housekeeping list that are simple, safe, and guaranteed to get your family giggling, thinking, and maybe making a little mess!
1. Amazing Floating Fish Magic That Moves on Water
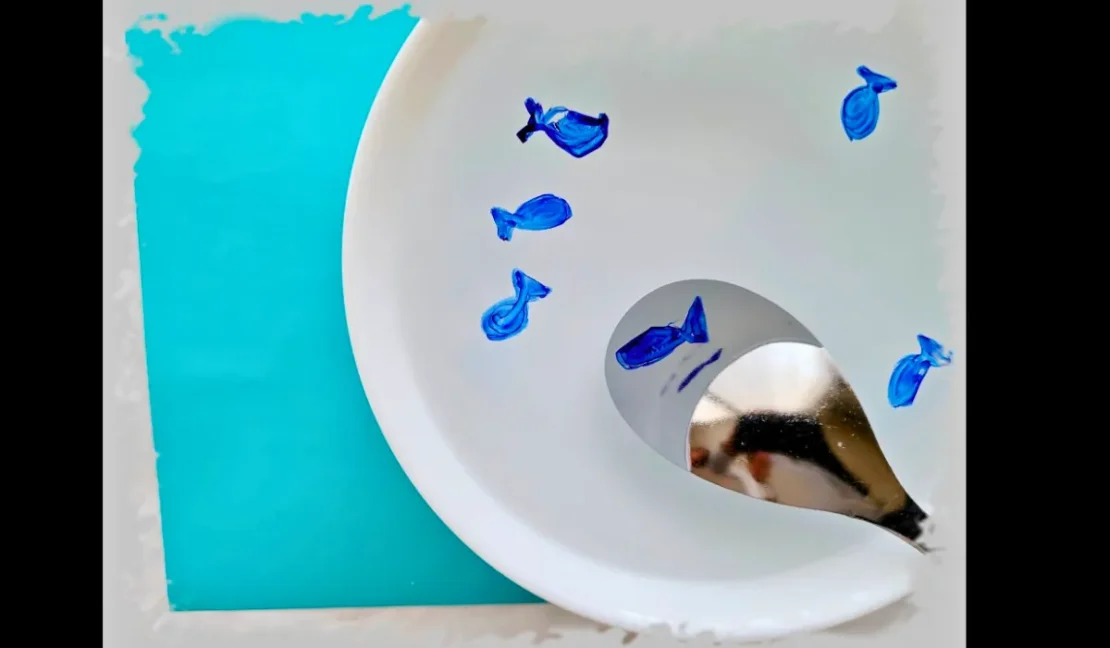
Image Source: www.youtube.com/@KidsArtZone
Create Your Own Swimming Drawing Adventure
This incredible experiment lets your child bring their artwork to life! They’ll create a simple fish drawing that magically lifts off the plate and floats across water like a real swimming fish. It’s perfect for teaching kids about density, solubility, and the fascinating properties of different materials while creating pure wonder and excitement.
Materials:
- Dry-erase marker (must be dry-erase, not permanent!)
- Flat glass plate or tray
- Water
- Measuring cup
How to do it:
- Draw the outline of a fish (or any fun shape) on the bottom of your plate using the dry-erase marker. Go over the lines again to make sure they’re connected. Let it dry for a minute.
- Very slowly, pour water onto the plate so it just covers the bottom. The water will find your drawing and, like magic, your fish will begin to float!
- Give the plate a gentle tilt and watch your masterpiece slide across the surface. How cool is that?
This easy experiment shows kids the power of solubility and density – plus, it never fails to put a huge smile on their faces.
2. Tooth Care Science Lab Using Real Eggshells
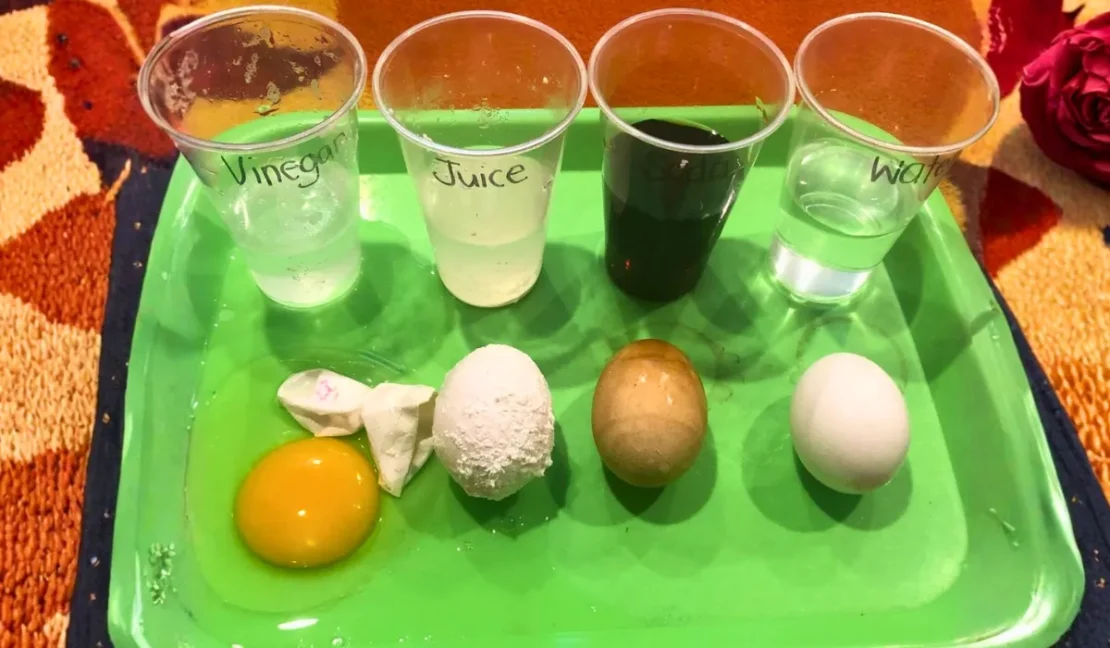
Image Source: TeachersMag.com
Discover Why Brushing Teeth Matters Through Fun Investigation
Transform your kitchen into a dental health laboratory! This experiment uses eggs as “pretend teeth” to show children exactly what happens when we protect our teeth with toothpaste versus when we don’t. It’s an eye-opening way to teach dental hygiene while exploring the science of acids, protection, and healthy habits.
Materials:
- 4 eggs
- Toothpaste
- Brown soda (cola)
- Lemon juice
- 4 glasses
- Sticky notes & bowl
How to do it:
- Write “Soda 1,” “Soda 2,” “Juice 1,” and “Juice 2” on sticky notes and place next to each glass.
- Fill one glass each for soda and juice halfway. Cover two eggs with a thick layer of toothpaste. Place those eggs in the “Soda 1” and “Juice 1” glasses. Put the two plain eggs in the remaining glasses.
- Leave them for 12 hours.
- Take the eggs out, rinse, and compare: the eggs with toothpaste should be less stained or soft than those without.
This one is perfect for showing kids the real-life impact of tooth brushing (and what happens when we skip it)!
3. Rainbow Water Walking Color Adventure

Image Source:www.oskarswoodenark.com.au
Watch Colors Travel and Mix Like Magic
Create a mesmerizing color journey that seems to defy gravity! Your child will watch in amazement as colors “walk” up paper towels and blend together to create beautiful new colors. This experiment teaches about absorption, color mixing, and capillary action while creating a stunning visual display that changes right before their eyes.
Materials:
- 6 clear containers (cups or jars)
- Red, blue, and yellow food coloring
- Water
- Paper towels
How to do it:
- Fill three containers with plain water and the other three with colored water (one red, one blue, one yellow). Arrange them in a circle, alternating plain and colored water.
- Roll up paper towels and bridge each container to its neighbor.
- Watch what happens over the next hour as the color “walks” up the towel and mixes with the clear water.
This experiment is simple science and pure color magic rolled into one!
4. Super Cool Sticky Ice Cube Challenge

Image Source:www.playdoughtoplato.com
Master the Amazing Salt and Ice Trick
Become an ice magician with this incredible trick that seems impossible! Your child will learn to “magically” pick up ice cubes using just a string and salt. This experiment introduces concepts about freezing points, melting, and how different substances can change the properties of ice in fascinating ways.
Materials:
- Ice cubes
- Mug of water
- String
- Salt
How to do it:
- Place an ice cube in a mug of water. Lay the string across the top.
- Sprinkle a little salt over the string where it touches the ice.
- Wait about a minute, then lift the string – if you did it right, the ice cube will stick!
Kids will be amazed at how salt changes the freezing point of ice to make this happen, and you’ll both get a chilly surprise.
5. Build the Strongest Paper Bridge Engineering Test
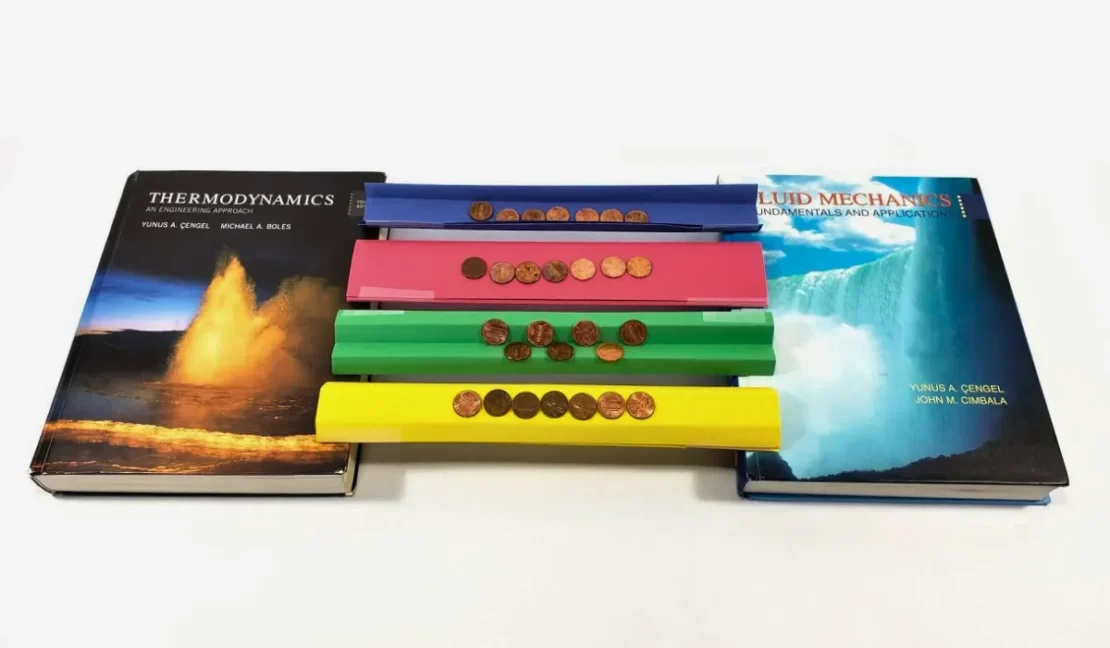
Image Source: www.youtube.com/@Science.Buddies
Design and Test Different Bridge Structures
Turn your child into a structural engineer! They’ll design different paper bridges and test which shapes can hold the most weight. This hands-on engineering challenge teaches about strength, design, problem-solving, and physics while encouraging creativity and persistence through trial and error.
Materials:
- White printer paper
- Stack of pennies
How to do it:
- Fold your paper in different shapes – flat, folded into an accordion, or rolled into a tube.
- Bridge the paper between two books.
- See how many pennies each bridge shape can hold before it collapses!
Ready for a laugh? Kids LOVE trying to beat their own “engineering records”—and this also sneaks in a fantastic intro to physics.
6. Musical Water Xylophone Orchestra Creation
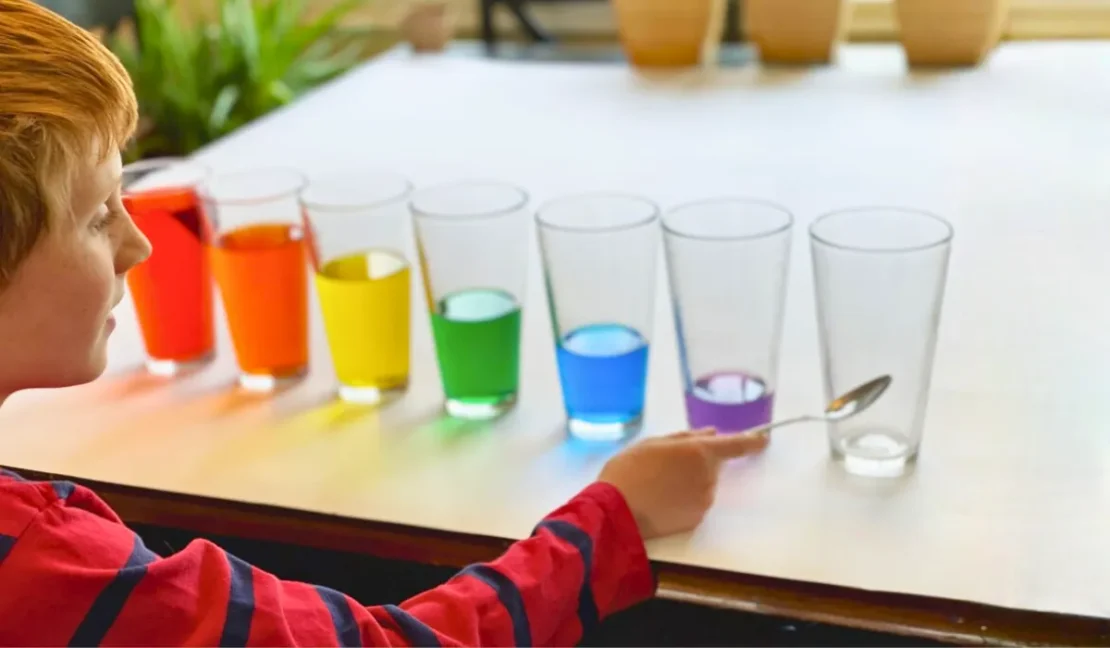
Image Source:Teach Beside Me
Make Beautiful Music While Learning About Sound
Transform ordinary jars into a magical musical instrument! Your child will create their own xylophone using water and discover how different water levels create different musical notes. This experiment combines music and science, teaching about sound waves, pitch, and vibration while creating a fun family band activity.
Materials:
- 6 identical glass jars or bottles
- Water
- Food coloring (optional)
- Metal spoon
How to do it:
- Pour different amounts of water in each jar (start with a little, add more as you go).
- Add a few drops of food coloring to each if you want some extra flair.
- Tap each jar with your spoon and listen to the music! Can you play a song?
It’s a musical way to learn about sound waves and pitch while creating a cheerful family band.
These DIY science experiments are all about making learning exciting and accessible for kids. Each activity is a chance for you to bond with your child, explore the world together, and build a foundation of curiosity that lasts a lifetime.
If you’re inspired and want your child to experience even more science fun, you’re always welcome at Apple Tree Pre-School BSD in the Educenter BSD Building. We love turning everyday moments into lasting lessons, and we promise our approach is all about joyful discovery—not just keeping things tidy (although we do try).
Want to see your child’s eyes light up with science? Send us a WhatsApp message or give us a call at +62 888-1800-900.
Come play and learn with other children—because life is one big, awesome experiment!