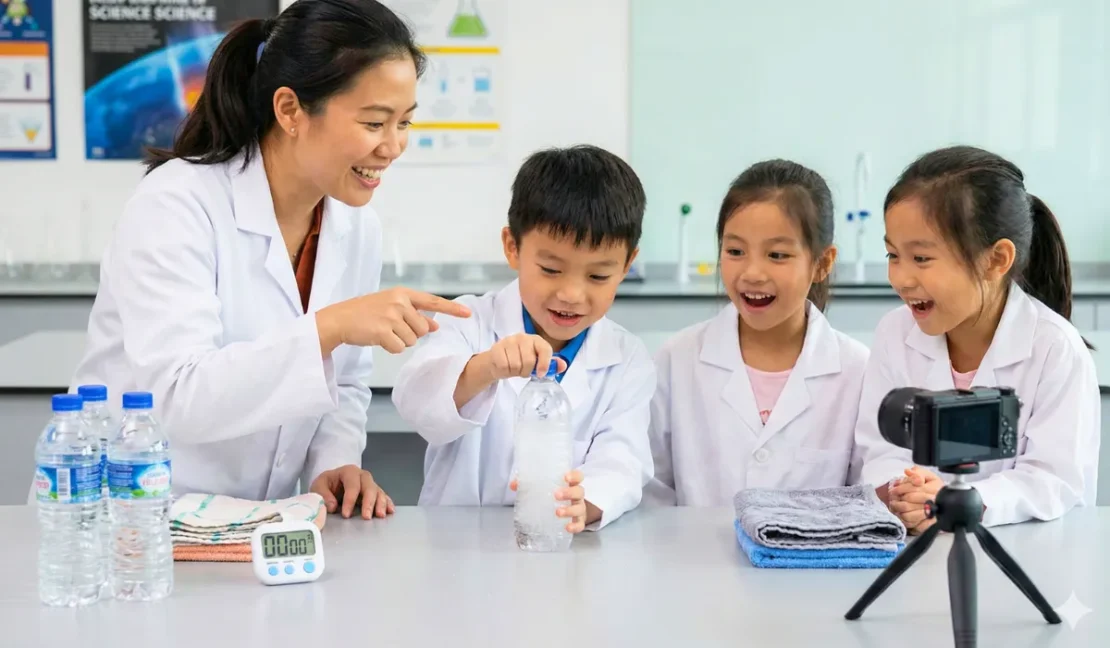
The room went completely silent when we poured water onto a tray and it froze right before our eyes. Twenty little faces stared in absolute wonder, mouths hanging open like they’d just witnessed actual magic. One boy whispered to his friend, “Teacher is a wizard!” I couldn’t help but laugh because honestly, the instant ice experiment feels like magic even to us adults. That moment of pure amazement reminded me why hands-on science activities are so incredibly powerful for young learners. Nothing beats watching a child’s eyes light up when they discover something extraordinary.
At Apple Tree Pre-School BSD, we believe that children learn best through exploration, wonder, and genuine excitement. The instant ice experiment perfectly captures all three elements in one unforgettable activity. Your child doesn’t need to memorize facts about temperature to understand freezing, they need to experience it directly. When water transforms into ice in seconds, the learning sticks in ways that worksheets never could. Today we’re sharing five magical ways to create instant ice at home with your children. These experiments are safe, simple, and guaranteed to create memories your family will talk about for years.
Science experiments like the instant ice experiment teach children about cause and effect in the most engaging way possible. Your child learns that actions have consequences and that the natural world follows predictable patterns. These early science experiences build the foundation for curiosity, critical thinking, and problem-solving skills. The instant ice experiment specifically teaches temperature concepts that connect to everyday life experiences. Let’s explore five amazing methods that will turn your kitchen into a science laboratory your children will love.
Understanding the Science Behind the Instant Ice Experiment
Before diving into the methods, let’s understand why the instant ice experiment works so beautifully. Water normally freezes at zero degrees Celsius, but under certain conditions, it can remain liquid below that temperature. This phenomenon is called supercooling, and it’s the secret behind every instant ice experiment. Supercooled water is extremely unstable and will freeze instantly when disturbed. Understanding this basic principle helps you explain the science to your curious little ones in simple terms.
The instant ice experiment demonstrates temperature, phase changes, and molecular movement all at once. When your child sees water transform into ice in seconds, they’re witnessing molecules suddenly organizing into solid crystals. This visual demonstration makes abstract concepts concrete and memorable for young minds. The instant ice experiment becomes a gateway to deeper scientific understanding as your child grows. You’re planting seeds of curiosity that will bloom throughout their educational journey.
1. The Supercooled Water Bottle Instant Ice Experiment
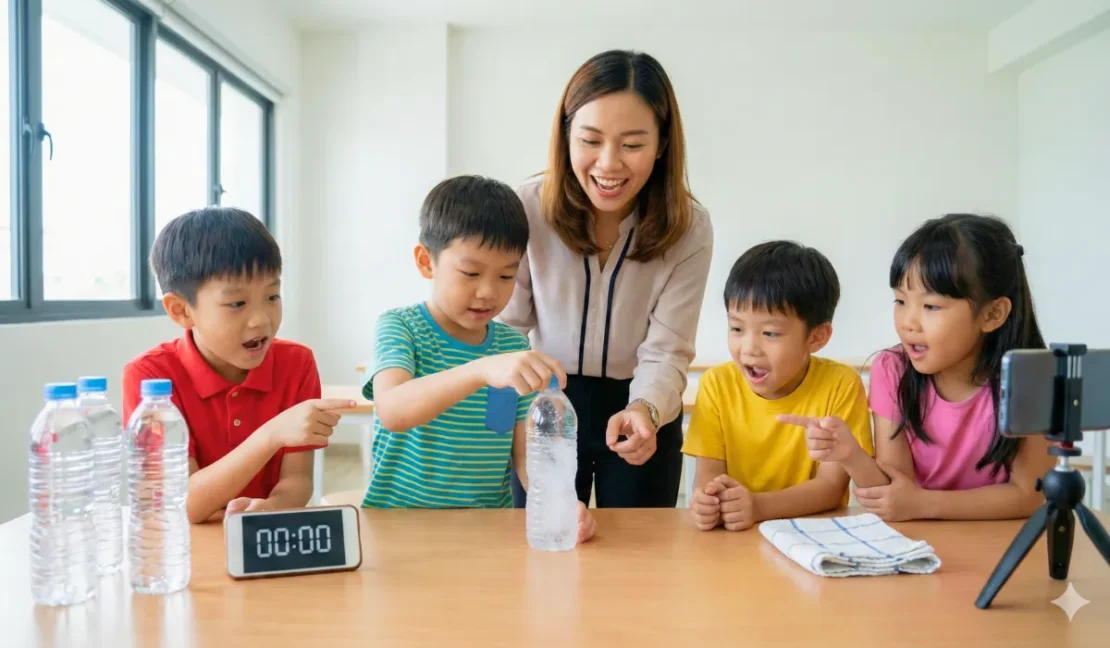
Image Source: Ai
This classic instant ice experiment uses purified water and careful temperature control. The key to success is using water without impurities that could trigger early freezing. When done correctly, you’ll tap the bottle and watch ice crystals spread through the water like magic. Your child will gasp in amazement as clear liquid transforms into slushy ice instantly.
Materials needed:
- 3 to 4 bottles of purified or distilled water (unopened)
- A freezer set to standard temperature (around minus 18 degrees Celsius)
- A timer or smartphone to track cooling time
- A flat, stable surface like a table or countertop
- Clean towels for any spills
- A camera or phone to capture the magical moment
Step by step instructions:
- Place the unopened bottles of purified water in the freezer lying flat
- Set your timer for exactly 2 hours and 15 minutes
- Check the bottles occasionally to ensure they haven’t frozen yet
- Remove one bottle very carefully without shaking or bumping it
- Hold the bottle firmly over a flat surface
- Tap the bottle sharply against the table once
- Watch as ice crystals instantly form and spread throughout the bottle
- Repeat with the remaining bottles for more instant ice experiment fun
2. The Ice Tower Instant Ice Experiment
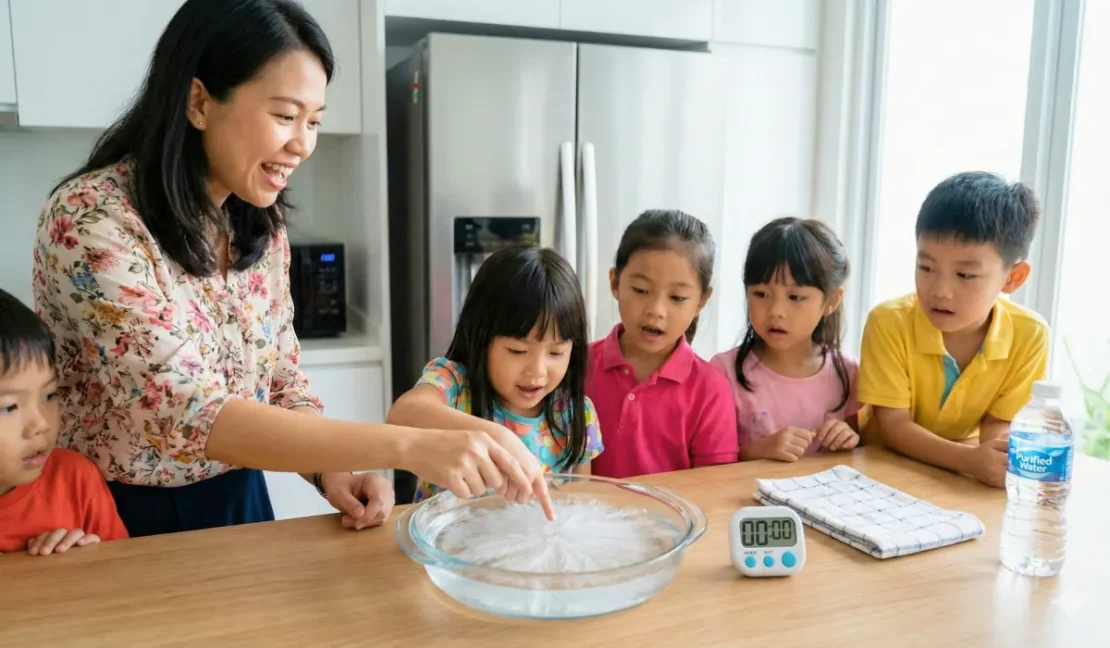
Image Source: Ai
This spectacular instant ice experiment creates a growing tower of ice from poured water. Children absolutely love this version because the ice seems to grow upward like a frozen sculpture. The supercooled water freezes layer by layer as it touches the existing ice. This instant ice experiment is particularly impressive for birthday parties or playdates.
Materials needed:
- 2 to 3 bottles of supercooled purified water (prepared using method 1)
- A shallow bowl or plate
- 2 to 3 regular ice cubes from your freezer
- A stable flat surface to work on
- Towels to catch water overflow
- Good lighting so children can see clearly
Step by step instructions:
- Prepare supercooled water bottles using the freezer method for 2 hours and 15 minutes
- Place a regular ice cube in the center of your shallow bowl
- Remove one supercooled water bottle from the freezer very gently
- Slowly and carefully unscrew the bottle cap without shaking
- Pour the supercooled water in a thin stream directly onto the ice cube
- Watch the ice tower grow upward as each layer freezes on contact
- Continue pouring slowly until the bottle is empty or the tower stops growing
- Let your child touch the tower gently to feel the ice texture
3. The Finger Touch Instant Ice Experiment

Image Source: Ai
This method lets your child become the magic maker in the instant ice experiment. Their own fingertip triggers the freezing reaction, making them feel like a real scientist. Ice crystals spread outward from their touch like frost patterns on a winter window. The personal connection makes this instant ice experiment unforgettable for young learners.
Materials needed:
- Purified or distilled water
- A shallow glass or ceramic dish (not plastic)
- Access to a freezer
- A timer
- Clean hands (wash thoroughly before the experiment)
- Towels for the workspace
Step by step instructions:
- Pour purified water into the shallow dish about 2 centimeters deep
- Place the dish carefully in the freezer on a flat surface
- Set your timer for 1 hour and 45 minutes
- Check the dish, the water should still be liquid but very cold
- Remove the dish extremely carefully without any bumps or vibrations
- Have your child wash and dry their hands completely
- Ask your child to gently touch one fingertip to the water surface
- Watch ice crystals spread outward from their fingertip instantly
- Observe how the entire dish freezes within seconds
4. The Sodium Acetate Hot Ice Instant Ice Experiment
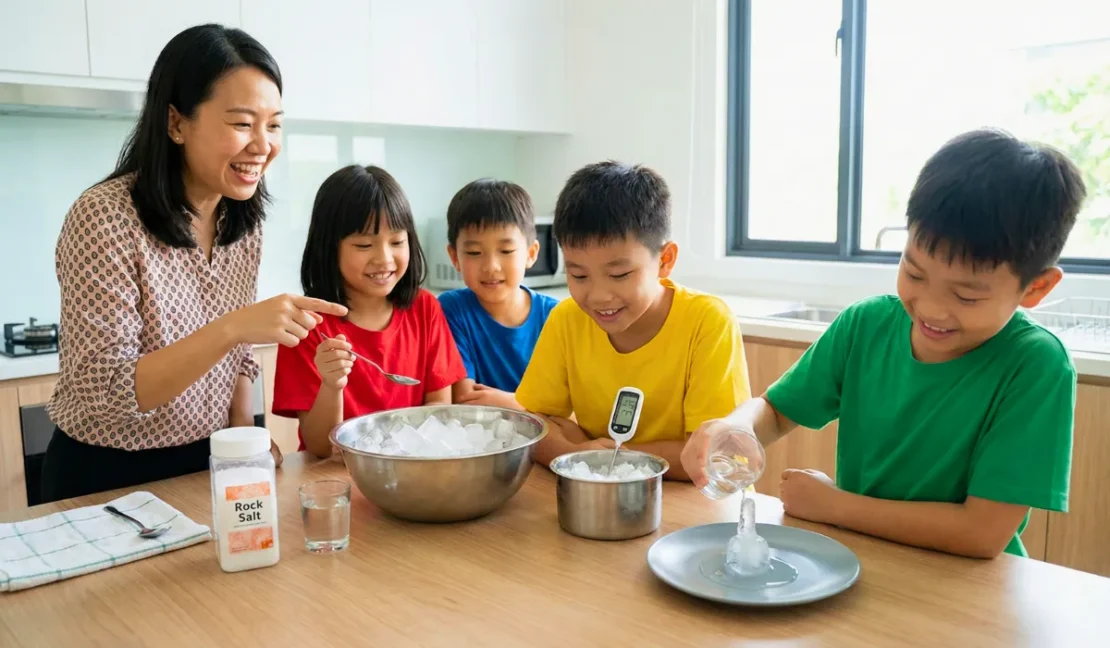
Image Source: Ai
This impressive instant ice experiment uses sodium acetate, also known as hot ice. Unlike regular ice, these crystals are actually warm to the touch, which surprises everyone. You can make sodium acetate at home using common kitchen ingredients. This instant ice experiment teaches supersaturation concepts while looking absolutely spectacular.
Materials needed:
- 4 tablespoons of baking soda (sodium bicarbonate)
- 1 liter of white vinegar
- A large pot for boiling
- A stove or hot plate
- A clean glass jar with lid for storage
- A shallow plate for the demonstration
- A spoon for stirring
Step by step instructions:
- Pour the vinegar into the large pot slowly
- Add baking soda one tablespoon at a time, waiting for fizzing to stop between additions
- Stir the mixture until all the baking soda has dissolved completely
- Heat the mixture on medium heat and bring it to a boil
- Let the solution boil until it reduces to about one third of the original volume
- Carefully pour the hot solution into the clean glass jar
- Cover the jar and place it in the refrigerator for 30 to 45 minutes
- Pour a small amount of solution onto a plate
- Drop a tiny crystal of sodium acetate or baking soda onto the liquid
- Watch the entire solution crystallize instantly into warm solid ice
- Let your child touch the warm crystals and compare to regular cold ice
5. The Salt and Ice Instant Freezing Experiment

Image Source: Ai
This accessible instant ice experiment uses materials every family already has at home. Salt dramatically lowers the freezing temperature of ice, creating an extremely cold environment. Your child learns real world science about why we salt roads during winter. This instant ice experiment connects classroom learning to everyday life beautifully.
Materials needed:
- A large bowl filled with ice cubes
- Half a cup of table salt or rock salt
- A small glass or metal container
- Room temperature water
- A plate with one ice cube for demonstration
- A spoon for stirring
- Towels for the workspace
- A thermometer (optional but educational)
Step by step instructions:
- Fill the large bowl with ice cubes about three quarters full
- Sprinkle the salt generously over the ice and mix well
- Wait 5 minutes for the salt to lower the ice temperature significantly
- Use the thermometer to show your child the temperature has dropped below zero
- Pour room temperature water into the small container
- Nestle the small container into the salted ice bath
- Wait approximately 5 to 7 minutes, stirring the water occasionally
- Remove the container carefully when the water is very cold but still liquid
- Place a single ice cube on the plate
- Pour the supercooled water slowly onto the ice cube
- Watch the water freeze instantly on contact with the ice cube
Safety Tips for Every Instant Ice Experiment
Always supervise your child during any instant ice experiment activity. Some methods involve very cold temperatures that can cause mild discomfort if handled incorrectly. Keep towels nearby for spills and ensure your workspace is suitable for water activities. The sodium acetate method requires adult supervision during the preparation phase especially.
Make the instant ice experiment a learning opportunity about laboratory safety too. Teach your child to observe before touching and to ask questions before acting. These habits transfer to future science learning and keep curiosity paired with caution. At Apple Tree Pre-School BSD, we incorporate safety awareness into all our hands-on science activities naturally.
Frequently Asked Questions About the Instant Ice Experiment
Q: Why didn’t my instant ice experiment work the first time I tried it?
The most common reason is using regular tap water instead of purified or distilled water. Impurities in tap water provide nucleation points that cause premature freezing. Also, leaving water in the freezer too long will cause it to freeze before removal. Try again with purified water and shorter freezing times for better instant ice experiment results.
Q: Is the instant ice experiment safe for toddlers to watch?
Absolutely, the instant ice experiment is safe for children of all ages to observe. However, keep the supercooled materials out of reach until the demonstration moment arrives. The sodium acetate method produces warm crystals that are safer for touching than regular ice. Always supervise closely and make sure small children don’t put materials in their mouths.
Q: Can we repeat the instant ice experiment multiple times in one day?
Yes, you can run the instant ice experiment multiple times with fresh bottles of purified water. Each cycle takes about two hours of freezer time to prepare properly. Your child can observe how consistent conditions produce consistent results each time. Repetition actually reinforces the scientific learning beautifully.
Q: What age is best for the instant ice experiment?
Children as young as two years old can enjoy watching the instant ice experiment with wonder. Older children from four to six can participate more actively and understand simple explanations. The instant ice experiment grows with your child, offering deeper learning as they develop cognitively.
Bringing Science Wonder Into Your Child’s Life
The instant ice experiment represents everything we love about early childhood science education. It’s visual, dramatic, hands-on, and creates genuine wonder that children remember forever. Your child doesn’t need expensive equipment or advanced knowledge to experience real science. The instant ice experiment proves that magic and learning can happen right in your own kitchen. These shared moments of discovery strengthen your bond while building your child’s scientific foundation.
At Apple Tree Pre-School BSD, we incorporate experiments like the instant ice experiment into our Singapore-based curriculum regularly. Our classrooms in the Educenter BSD Building are designed to spark curiosity and encourage exploration. We believe that children who experience wonder early become lifelong learners naturally. The instant ice experiment is just one example of how we make learning unforgettable.Ready to give your child more magical learning experiences like the instant ice experiment? Send us a WhatsApp message or call us at +62 888-1800-900 to learn about our programs. Come visit our classrooms and see how we turn everyday moments into extraordinary learning adventures. Our Toddler through Kindergarten programs are designed to nurture curious, confident, and happy children. Register now and let your child discover the magic of learning with us! 🧊👧💚